Background

Showing posts with label compost. Show all posts

Mar 25, 2013

A Raspberry Patch


Below you will see the evolution of my Raspberry Patch.  The first 4 pictures are from Spring of 2012.  The rest are from this Spring (2013).  Remember, you can always click on the photos to Zoom in.


Clockwise, from top left, I tilled up some grass, raked out the grass and roots, planted Raspberry Starts, and then mulched with Goat Manure/Hay mix, and then Straw in the middle.   I did put Cardboard under the mulch.  This was BEFORE I watched the Back to Eden Film.   I don't necessarily think what I did was  a bad thing, except the tilling was unnecessary.  I could've just planted directly IN the grass and then put Newspaper around all of the plants, and composted and mulched on top.

Here is My Raspberry patch THIS year.  I should've gotten a photo when everything was green.  I did get several handfuls of beautiful Raspberries in the fall.  The tips of the plants bore, as you can see in the photos.

We put those Raspberries in in a hurry, so I didn't really do everything how it should be.  So this year we went out and worked on the patch some more.

My tough kids hauling the railroad ties.


Railroad ties in place with newspaper under to help kill the grass.


Stakes in place to run ropes for supporting raspberries.  I also mildly pruned the berries.
I read that you should prune anything that fruited the year before.  So I did.  Then I read that Raspberries that fruit the first year, will usually fruit on the end.  But if you leave those canes, they will produce the rest of the way the second year.  So unfortunately I won't find out if that's true.  Also  I hope with all the mulch I added, that the Raspberries aren't buried so deep that they can't find their way out.  Updates will follow as I see progress.


Mar 13, 2013

Mulch - "The Earth is Meant to Be Covered"


    I know I keep referring back to this fabulous gardening movie, Back to Eden, but when you find something so Golden it is hard not learn from your mistakes and change what you're doing so you can see results.   
    As I mentioned in my "6 Rules of Gardening" Post, (click to read) Mulch is a key factor to a successful garden.  It also reduces the workload of the typical gardener after time.  Much of the information I will be sharing here is taken directly from "Back to Eden" so if you don't want to watch the film, you can learn some of the key principles here.
    "Everywhere in nature where man has not been, the ground is covered.  The ground is meant to be covered, it is a living organism. [It can be compared to skin for animals, feathers for birds, scales for fish, etc.  When you take the cover off, it becomes vulnerable]"
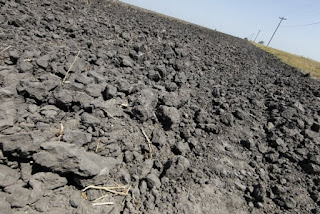
    I had never thought of dirt or soil before as a living organism.  But when you think about it scientifically, it most definitely is.  When we change our thinking to reflect that it is a living thing, it then makes complete sense to "protect it."  As soon as I understood this concept, I pictured in my mind all of the dead, non-fertile soil I have seen various places throughout my lifetime.  Most farms and large gardens that are cleared and tilled at the start of each season are empty, light colored, dull plots of land until the seeds are added and the soil amendments and fertilizers to make them grow.   Crops have to be rotated each growing season to avoid over-depleting the soil of nutrients.  But sadly, much of our soil is already grossly depleted.  This photo is a bit of an exaggeration since this particular land is also suffering from drought, but the compaction and lack of color are consistent with depleted soil.  
     Farmers spend thousands of dollars on soil amendments, fertilizer, and even pesticides, and year after year are facing the same problems again with each new growing season.
     Paul in the “Back to Eden” film, takes us on a journey, that leads our thoughts back to the Creator.  He talks about how God gardens the earth, and what we can learn to both improve our yields, and simplify our process when we mimic what nature is already doing.
     The next time you have the opportunity to walk through a forest, or field or any areas that are mostly untouched by man, kneel down and dig into the dirt, and explore what you find.   For example, in a forest you find leaves, pine needles, pine cones, twigs, seeds, etc. in various stages of decay laying atop the rich black composted floor.  This is because in nature all of these things drop to the ground and are left untouched to be broken down by the microorganisms in the organic materials as well as the soil.   Animals come through and crunch up the leaves and twigs, the wind blows and mixes things around, and the rain comes and wets everything.  All of this creates a natural covering for the ground.  Its what helps to keep weeds down, and give nutrients to young growing trees and plants.   In a field you will find the dead fallen grasses and rocks and other things covering the ground.  
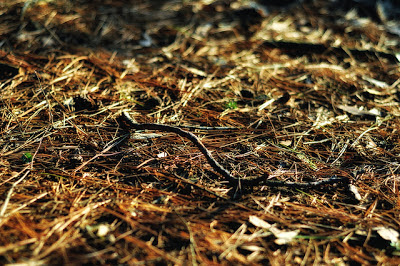
     “The ground is meant to be covered.”  What can we learn from that statement when we apply it to our own corner of ground that we have the privilege of caring for?  The answer is Mulch.  Lots of Mulch.
According to Paul (Eden Film) the best mulch is wood chips.  But he also says that he has tried other things successfully as well.  Wood Shavings, Compost, and even Rocks, just so long as the ground is covered.   
     The reason wood chips work so well is because they act as a sponge, absorbing as much moisture as possible when it rains and holding it until the ground beneath needs it.  They also, amazingly don’t blow away in the wind, they stay put.  They never compact, are always soft, and always allow for air to be present.  You could even drive a truck on it and it wouldn’t compact.
     Mulching is not a new concept.  People have been using this idea for years and years.  What makes it so amazing to me, is understanding how it works, and then putting it into practice correctly and seeing the results.  
    I have an excess of Goat manure available at all times, as I’ve mentioned before.  So when I was at a loss for composted material, often I would dump loads of the fresh manure mixed with hay in many areas of my yard just to help keep the weeds down.   A few years ago we tore out the grass in one end of our yard to create a large garden area.   I covered the whole thing with the manure/hay mix to help mulch the area.  I was amazed the next spring at how few weeds I had to pull before planting my first garden in that area.   Plus having the nutrients from all that compost sitting on top of the ground proved to be another benefit.
    Paul explains that as it rains and these materials absorb the moisture, and then release it.  It actually releases a type of “compost tea” down into the soil below, carrying with it the nutrients contained in the organic matter sitting on top of the soil.   This is exactly what happens with wood chips.  They absorb all the rain like a sponge, and when the ground below and the roots of the plants call for water, they are getting the modified, improved water that is being release WITH nutrients from the wood chips, and decomposed organic materials above.  
    So last year we decided to put the mulching into practice properly in a couple of our garden areas.  We prepared the garden the way Paul showed to prepare a NEW garden area, just to be sure we kept the majority of the weeds down.   We lined our entire garden bed with 3-4 layers of newspaper, and then sprinkled a layer of topsoil over it.  Literally sprinkled.  Not much at all.  You could still see quite a bit of newspaper.  Secondly we did a thin layer of compost over that, and then finished with about 4 inches of wood chips.  The garden looked fantastic!   Then we proceeded to plant directly on top of the newspaper, by pushing the mulch out of the way with our hands, making a hole, and putting in the started plants I had grown in the greenhouse.  After planting, we put the mulch back carefully around the plant, and because of the season, we used the green Wall of Water Protectors to ad additional warmth and frost protection to our plants.
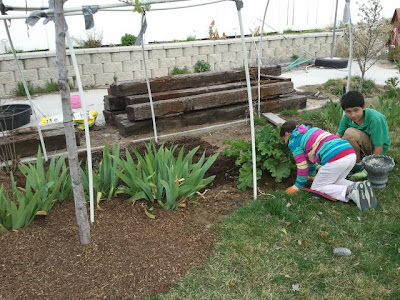
The kids helping prep the the garden area with compost and mulch.
     We had a beautiful garden, and most of it did quite well.  We had a few areas where an overgrown tree prevented enough sunlight from getting through, stunting the growth of some of those plants.  but everything else did really well.  
     So far I see almost no weeds, and because we had a very cold winter with lots of snow on the ground, the wood chips are holding the moisture in the ground, and composting the under layers.  I am excited as we come into year two to be able to continue to enjoy the effort we exerted last year. 

This is in July when the garden was in full force.  We had no weeds all Summer, and as you can see everything grew and produced beautifully!  I love having what I call a "mixed use" garden, so that there are attractive flowers as well as productive plants.

Mar 6, 2013

Composting, Let's Keep it Simple!

         There's actually a lot of science and good information behind composting, but I want to start out simple.  I wan't you to read this and think to yourself, "I can do this!"  And really, it IS simple, and can continue to be until you find yourself having a greater need an purpose for your compost.  I remember the huge round composting cages my great grandfather had on his property in California.  I think he must’ve truly been the master gardener in the family.  The garden was massive, and there were fruit trees everywhere, and don’t forget my Grandma’s fresh Strawberry Rhubarb pie, straight from the garden.  I only wish I had been old enough to really learn from them.  Gardens were a necessary way of life in their day.  You gardened because you wanted to eat.  
     When I first tried composting, I bought one of those Stationary black bins with a lid and just started throwing all of my kitchen scraps in it.  While in theory I wasn't doing anything wrong, Compost needs air, and water to properly break down and heat up.  And it was pretty hard to “stir” anything in such a narrow space.   So on my second attempt, I decided to do “open composting” where my pile was out in the open and somewhat contained.   I purchased some 4 ft. T-posts from Home Depot along with some 2 ft. wire fencing.  I basically made an “E” shape with two sections so I could keep track of older and newer compost and be able to get a pitch fork in there and mix it around good.

I am by no means, an artist, but I thought it would be helpful for you do have a sketch of what I’m talking about.   I can’t even take a picture of mine, because its piled so high, you  wouldn’t be able to see the stakes anymore.  So basically there are 6 T-Posts, and I’ve wrapped and attached the wire grid all the way around.  You want to keep it nice and tight so it can help support your pile as it grows and as you mix it.  I have found that the easiest way to mix well is to use a pitch fork.  You basically throw everything out of your pile, and make a new pile on the ground beside it, effectively mixing as you go.  Then pitch it all back in.  I only have to do this maybe every month or so.  But for me, this was still a lot of work so I wanted a better solution.

A few years ago I found a Rotating Compost Bin that would hold 80 gallons!  (Thats over 10 Cubic feet!)
And finally it was something I could handle!  It is made by “Lifetime Products” so it is very good quality.  I purchased 3 and had my teenage boys assemble them, so we could put them to use immediately.   I still use my old compost “frame” as a holding tank for fresh manure, leaves and lawn clippings to start decomposing before adding them to my composter.  The reason this works so well is because it makes it so easy to give compost the 3 things it needs most.  Heat, Air, and water.   I simply open the latched lid on my composter and wet it down with a hose once a week, as well as dump in my kitchen scraps whenever I have them.  And then turn the barrel a few times and I’m done.   The black barrel absorbs the heat from the sun, so even if we only turn it once a week, we get compost in about 2 months.  I think if we were out there turning it daily it might result in compost much quicker.

I know you guys are probably starting to think I am just selling you something here, but truthfully, I USE everything I recommend to you.  I  am a big fan of technology in all departments of life.  I love gadgets and things that make life easier.  And without alot of these “tools” and “gadgets” I wouldn’t have the time or energy to accomplish much of what i do.  I also realize as a prepper, that it will be a sad day around here if the power goes out and I have to do things the old fashioned way.  :-)

Back to compost.  Theres a few other things to be aware of if wanting to create good compost rapidly. 

1.) Size matters - If you start throwing in big orange peels and banana peels and Pineapple greens, you are going to be able to recognize them for the next 6 months in your bin, likely.  It is much better to break things down to a smaller size.  This allows more surface contact with other decomposing materials, water, and heat, allowing these items to decompose more quickly.  There are a few easy ways to  break these things down.  If you juice with a masticating juicer, when you’re done, simply run your citrus peels through the juicer, it breaks them into bits, effortlessly, and you can just add it with the pulp from your juicer, into your composter.  Also throwing items like egg shells and banana peels into your food processor for a quick whiz can help as well.  I’ve even just snipped them up with a pair of kitchen scissors as I’m holding them over the bin.  
      If your not interested in the additional effort.  Use those items differently.  For example, Banana peels are said to have a highly positive effect on Rose bushes and other Acid Craving plants.   Rake away some of the mulch around those things and bury a few banana peels underneath.  

   2.) You need to make sure you have a good ration of Brown waste compared to Green waste.  What does this mean?  Different waste contains different nutrients, and decomposes at different rates.  Remember the science I was talking about?  Things that decompose faster, produce heat and help to decompose items that may rot more slowly.  I will create a list at the bottom of the post to help guide you. 

   3.)Use an existing compost mix to get a head start.  You could almost compare compost to yogurt here.  It is loaded with microorganisms (ie: good bacteria)  that work together to break down the raw materials (ie: milk)  So if you start with compost that has already gone through the process and contains the nutrients and composition you are hoping for, this can speed up the process.  Be sure to save some of your newly made rich compost to start your next batch.


Brown (Carbon)
Green (Nitrogen)
DONT USE AT ALL
Dry Leaves
Pine Needles
Newspaper (shredded)
Sawdust
Wood chips/ shavings
Twigs
Hay/Straw
Peanut Shells
Cold Ashes from wood
Dryer lint
Cereal boxes (shredded)


Fruit & Veggie Scraps
Grass Clippings
Coffee Grounds
Manure from horse, cow,
Goat, Chicken, Bat, etc.
Egg Shells
Tea Bags/leaves
Plant trimmings
Moldy Bread
Banana peels
pulp from juicer
Milk
Fat
Meat
Domestic Pet Waste
Bones
Oils
Diseased Plants (Can spread disease)
Inorganic materials


     Basically you need about a 50/50 ratio of Green and Brown.  So to make it easy, I like to keep a bag of last years leaves next to the composter and every time I dump a bin of kitchen scraps, I add about the same volume of dry leaves to the composter and spin it.  

      If you are filling up your composter little by little, you want to make sure that when its relatively full, you stop adding new waste to it for 6-8 weeks until you have developed your compost.  Because otherwise you will always have bitts of un-composted materials in there.  This is why I have 3 bins.  I only actively ad to one or two at a time.  That way I have a sort of rotation of Compost in progress, Compost ready to use, and a  bin for adding to.   And truthfully, in the winter, I don’t add scraps to my bins.  I give them to the geese and chickens because there is nothing for them to forage on when there is so much snow, so I dump my juice pulp and other scraps, including the crumbs from the bottom of cereal boxes (Healthy cereals) old bread, etc. to help supplement their diets in the winter.  

     Also, I am rather lucky to have a natural Brown/green mix occuring daily in my backyard.  What? No fair, you say?  It is the combination of goat poo mixed in with the discarded hay from the feeder.   We pull out at least a wagon load each week and ad to the “holding compost pile” before putting into the composter.   I have to say this combination along with twigs, leaves, and kitchen scraps have made an amazing compost for my garden each year. 

    Goat berries are not as hot as Chicken manure so they can even be put straight into the garden non-composted.  The mix works as a mulch to begin with, and then with watering and decomposition the nutrients are released into the soil. Please feel free to ask your questions, and share your thoughts below!

Feb 27, 2013

Udderly Delightful!

     In case the title doesn't quite give it away, we are talking about goats.   My family has been enjoying and learning about goats for quite some time.  Well, lets be honest, I do the enjoying, and they do the learning, ha ha.  First let me start off by introducing you to a couple of my girls:


     Left is Cocoa, a Nigerian Dwarf/Nubian cross.  She is not quite a year yet, and I hope she's expecting. Then my big white girl, Zeba, a 4th generation Mini-Mancha (Nigerian Dwarf crossed with LaMancha) she is about 3 years old, and the best milker I've ever had.  She's mild tempered, and quite friendly.  And then just barely you can see the eyes of Sugar poking out behind her.  She is Cocoa's sister but is pure white, and I hope she is expecting as well.    They have all been exposed to this handsome fella:


     This is Rocky.  Up until recently he was our resident stud man.  He's a purebred, registered Tri-color Nigerian Dwarf.   And I soooo hope we get some of his babies.   He was so active his first year that we had to get rid of him because he started stinking at a very young age.  I wasn't planning on keeping him forever, but we did bottle feed him from a baby, so he was a doll.
     I had always wanted to have milk goats.  And at first it started because we had 2 kids allergic to milk as babies and I had read that most people with milk allergies can tolerate goats milk because it has smaller proteins and is easier to digest, among about a million other reasons.   We bought our first milker in about 2004 or so and discovered after having her home less than an hour, that our yard and fencing wasn't sufficient to keep her.  She ran away twice that afternoon and so we had to tie her to a tree.
     I really didn't have the heart to keep an animal tied up, so the previous owner was gracious enough to take her back.   After that we tried a couple of Pigmy goats and a Nigerian dwarf.  The pigmy's weren't bottle raised and wouldn't have anything to do with us, so really we didn't get to enjoy them much.   We had to sell our animals when we moved so we went about 4-5 years before having them again.
    About 4 years ago I decided to try again.  A friend was moving and had to sell her milker and a Yearling.  And this time we had bought property with a barn and corrals so we were sufficiently set up to care for them.  We all really enjoyed it at first, but sadly my kids have mostly lost interest except for one.  But he is a trooper and milks every day, twice a day for me, and I really think he doesn't mind except for occasionally when other activities interfere and cause him to have to go out at late at night when its dark and snowing to take care of the milking.
   When we bred our yearling, Lucy and taught her to milk it had to be one of the most horrific experiences (for both her and us).  I'm not sure how we all made it out alive.  Likely quite comical for any passers by.  But she was so stubborn, she'd do a double back kick on the milk stand trying to clear the room of any potential milkers.   It took 3 of us at first to get her milked.  2 to hold each of her back legs, and one person to milk.  (Below is Lucy in front with her 2 babies behind, followed by PattyCake)

She was a full size dairy goat, a Saanen, and it was all we could do to keep her under control.  She eventually settled down, and by the next year was a very well behaved milker, as long as you didn't dawdle.

  I really enjoyed our other Saanen, Patty-Cake, she was 10 years old or more, and very mellow and well behaved.  Not to mention too fat to cause any real trouble, ha ha!  And did I mention the VERY best thing about goats?  BABY goats!  :-)  Here is PattyCake with our very fist babies!  Oh how we loved them!


We eventually sold our Saanens to try some smaller goats. 
 (The first ones pictured at the top.)

Hopefully you enjoyed your introduction to my herd, I will do several follow up posts on milking, the benefits of goat milk, and more!  I am more of a fair weather milker, just ask my boys, so once it warms up you will see alot more of what goes on around here. 
Check back again soon, and thanks for reading!


Feb 20, 2013

A Whole New OLD Way to Look at Gardening

     I recently came across an amazing film that changed everything I thought I knew about gardening, and plants.  It is well done, professionally filmed, and it has the potential to change your life.  There are several key concepts introduced here that when applied even to the simplest backyard gardens, have immediate and long lasting results.
    This is a full length film so plan sufficient time to watch it, or you can watch it in sections as it is easily set up to do it that way.
Click on photo, then scroll down to find video
     Even in my own backyard garden, I have been able to start applying some of these principles, and in the first year that I have used them, I can see some HUGE improvements and positive changes in my yard, my dirt, my plants and my crop. This years gardening should be even easier because of what I have put in place last year.
     I love the main idea of the film which is that God is the great Master Gardener, and by observing what we see in nature and learning from it, we can assist him in creating something beautiful in our own yards.  Each concept is laid out and explained in such a way that it makes amazing sense.
     I would also recommend purchasing the DVD if nothing else, just to support this great effort.