Background

Showing posts with label Goats Milk. Show all posts

Mar 27, 2014

Making Greek Yogurt!

First off you'll need to make regular yogurt with your fresh raw milk, following the instructions on a previous post:  Homemade Yogurt Recipes and Instructions.   Then before refrigerating, follow the instructions below:

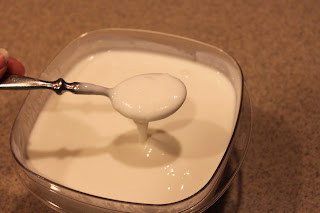
The next part is really quite simple, you just need to find something tight weaved to pour your yogurt through so it can drip and release any excess whey and moisture.  This is what gives the yogurt a nice greekish consistency.  See below:


This is a large flour sack towel, which is quite a bit thicker than cheesecloth, but not too thick for the liquid to pass through, and it also won't leave lint in your food.   You can usually find these at a cooking store, or anywhere you can get canning supplies.   Or you can order them on Amazon.com

This process usually doesn't take more than an hour to hour and a half, at which point I dump the thickened yogurt into a container, and scrape the excess off the towel with a spatula, then put it in the refrigerator to cool and solidify some more.  

You can add fruit, maple syrup, Agave, or any other mix ins you like and get that creamy, rich flavor you get from other store bought greek yogurts, while knowing that yours is much healthier.  Enjoy!


PS, if your'e looking for another great yogurt maker, I recently purchased the Dash Electric Yogurt Maker from Amazon, and it has a mesh strainer included for making greek yogurt!   Love it!


Mar 1, 2013

Homemade Yogurt Recipes and Instructions


I have made Homemade yogurt a couple times, and a couple different ways.  I also received a recipe from a FB friend on how she does it.  I will include everything I know and have found out and you can pick what seems like the best way for you to make it.

 First off this part is the same in all the recipes.  You have to heat milk on the stove until it is almost boiling, but not scorched.   You can use whole, 2%, 1% or skim milk, raw or pasteurized, but what you choose will affect the thickness of your final product.   I use fresh goat milk from our backyard farm.  It has a good amount of cream, but still produces a rather thin yogurt.  One thing I've read is that a lot of commercial yogurts have gelatin in them, which I personally don't want to ad, but another way to thicken is to ad Powdered Milk.   (2.5 Cups per gallon of milk)  You do this while its hot so it dissolves well.  Then you have to leave the milk to cool for a while until it reaches about 110-115º F.  Once it has cooled down you can mix in your starter.  There is freeze dried starter available from  Yogourmet at most health food stores, online at Amazon.com or you can just get a container of fresh natural yogurt.  It is best to get plain yogurt with as few ingredients as possible, and make sure it says that it CONTAINS live and active cultures, not just made from them.  Those cultures are what consume the milk and convert it into yogurt.   Also once you have made yogurt, or in my case got some from a friend.  You can save some and use it to culture the next batch.  I've heard this only works for about four or five times before it becomes to strong and sour.

Basic Recipe:
1 Gal. Milk
2.5 C. Powdered Milk (Optional)
4-6 oz. Yogurt, OR 2 packets freeze dried starter
Warmer of choice

   Once the milk is cooled some and the starter is mixed in, its time to "insulate" the yogurt so it can culture at the proper temperature.  There are about 100 different ways you can do this part.  The first time I made it, I used my Excaliber  Food Dehydrator.  It was tall enough once I removed all the trays, to stand up Quart size jars inside.  Then I just set the temperature for 110º and turned it on.  That kept the air around the jars at a steady temperature while the Yogurt was culturing.
     However, since then, I came accross a couple of yogurt machines I decided to try.  One is the "Yogourmet" Multi.  I really like this one because it is simple and straightforward.  It has one large 2 Qt. container that fits inside the main container which you fill with water.  The water bath method keeps the temperature nice and even around the yogurt.  I incubated mine about 7 hours and It worked great!   I also have the YoLife Yogurt maker by Yogourmet.  This one is basically a heated platform you can set several jars on, then it has a cover that goes over them, and it maintains the proper temp as well.  It also comes with a second taller cover for Quart size Jars.

  Also many people use a crockpot for the whole process, from start to finish.  it takes about 2.5 hours to heat the milk to the right temperature, depending on the crockpot. (approx 180º) Watch yours closely the first time and see how long it takes.  Then you have to let it cool several hours to the right temp. (110-115º)  Then simply mix in your starter, and wrap the crockpot in a large towel and let it sit 6-8 hours.  You could also use the water bath  method in the crockpot by pouring the milk into jars and then sitting them in the warm water inside the crockpot.
  The fourth and final way that I know of is using a small to medium cooler, and pouring hot water in the bottom.  After the milk has cooled and you ad the starter you would pour into quart jars or large plastic bowl and put into the hot water in the bottom of the cooler.  Then close the lid, wrap in a towel and let it do its thing for 6-8 hours.
    Once you have your finished Yogurt you can prepare and store it however you like.  Some people like to put sugared & chopped fruit in the bottom of small containers, and spoon the yogurt over the top.  Others will just keep a large container in the fridge plain.  Your plain yogurt also makes an excellent Sour Cream Replacement.  


Feb 27, 2013

Udderly Delightful!

     In case the title doesn't quite give it away, we are talking about goats.   My family has been enjoying and learning about goats for quite some time.  Well, lets be honest, I do the enjoying, and they do the learning, ha ha.  First let me start off by introducing you to a couple of my girls:


     Left is Cocoa, a Nigerian Dwarf/Nubian cross.  She is not quite a year yet, and I hope she's expecting. Then my big white girl, Zeba, a 4th generation Mini-Mancha (Nigerian Dwarf crossed with LaMancha) she is about 3 years old, and the best milker I've ever had.  She's mild tempered, and quite friendly.  And then just barely you can see the eyes of Sugar poking out behind her.  She is Cocoa's sister but is pure white, and I hope she is expecting as well.    They have all been exposed to this handsome fella:


     This is Rocky.  Up until recently he was our resident stud man.  He's a purebred, registered Tri-color Nigerian Dwarf.   And I soooo hope we get some of his babies.   He was so active his first year that we had to get rid of him because he started stinking at a very young age.  I wasn't planning on keeping him forever, but we did bottle feed him from a baby, so he was a doll.
     I had always wanted to have milk goats.  And at first it started because we had 2 kids allergic to milk as babies and I had read that most people with milk allergies can tolerate goats milk because it has smaller proteins and is easier to digest, among about a million other reasons.   We bought our first milker in about 2004 or so and discovered after having her home less than an hour, that our yard and fencing wasn't sufficient to keep her.  She ran away twice that afternoon and so we had to tie her to a tree.
     I really didn't have the heart to keep an animal tied up, so the previous owner was gracious enough to take her back.   After that we tried a couple of Pigmy goats and a Nigerian dwarf.  The pigmy's weren't bottle raised and wouldn't have anything to do with us, so really we didn't get to enjoy them much.   We had to sell our animals when we moved so we went about 4-5 years before having them again.
    About 4 years ago I decided to try again.  A friend was moving and had to sell her milker and a Yearling.  And this time we had bought property with a barn and corrals so we were sufficiently set up to care for them.  We all really enjoyed it at first, but sadly my kids have mostly lost interest except for one.  But he is a trooper and milks every day, twice a day for me, and I really think he doesn't mind except for occasionally when other activities interfere and cause him to have to go out at late at night when its dark and snowing to take care of the milking.
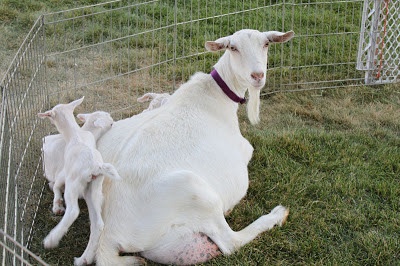
   When we bred our yearling, Lucy and taught her to milk it had to be one of the most horrific experiences (for both her and us).  I'm not sure how we all made it out alive.  Likely quite comical for any passers by.  But she was so stubborn, she'd do a double back kick on the milk stand trying to clear the room of any potential milkers.   It took 3 of us at first to get her milked.  2 to hold each of her back legs, and one person to milk.  (Below is Lucy in front with her 2 babies behind, followed by PattyCake)

She was a full size dairy goat, a Saanen, and it was all we could do to keep her under control.  She eventually settled down, and by the next year was a very well behaved milker, as long as you didn't dawdle.

  I really enjoyed our other Saanen, Patty-Cake, she was 10 years old or more, and very mellow and well behaved.  Not to mention too fat to cause any real trouble, ha ha!  And did I mention the VERY best thing about goats?  BABY goats!  :-)  Here is PattyCake with our very fist babies!  Oh how we loved them!


We eventually sold our Saanens to try some smaller goats. 
 (The first ones pictured at the top.)

Hopefully you enjoyed your introduction to my herd, I will do several follow up posts on milking, the benefits of goat milk, and more!  I am more of a fair weather milker, just ask my boys, so once it warms up you will see alot more of what goes on around here. 
Check back again soon, and thanks for reading!